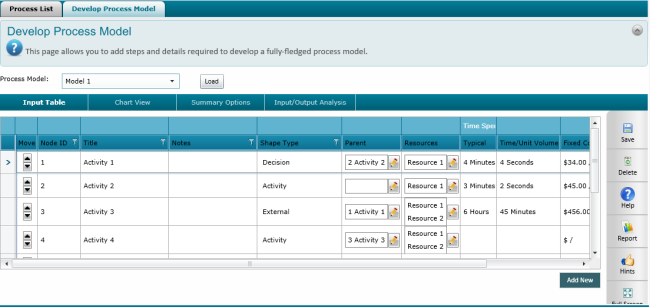
Develop Process Model tab allows you to add the required steps to the process model in order to develop a fully fledged model.
Input Table
STEP 1: Select the process model that you require to edit from the drop down provided. Click 'Load'.
STEP 2: Click 'Add new' button below the screen and enter the required fields.
|
Field |
Description |
|
|
Node ID |
Auto populated and non-editable. If rows are added/deleted in-between existing rows, the numbering is updated: 1,2,3 -> 1,2,3<new>,4 (so previous 3 becomes 4) and any relationship made in the Parent Node ID is also updated (so any Node that had ‘3’ as the parent must now say ‘4’). Same rules applies when deleting a node. |
|
|
Title |
Title of the node |
|
|
Notes |
Here, you can note down any additional details around this activity/decision. This would not appear in the diagram. | |
|
Shape Type |
Select the required shape type from the dropdown. Following options will be listed for selection.
|
|
|
Parent Node |
Click the edit button and a pop-up will open where you can define the details for each parent node ID. Click Add new to add a node.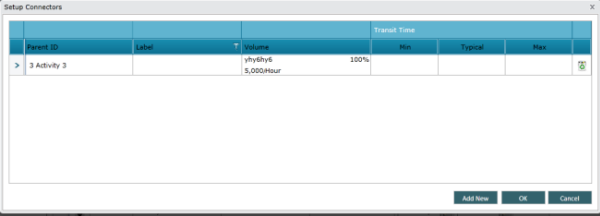 |
|
| Field | Description | |
| Parent ID | Dropdown would list all existing Node IDs where you can select a parent ID. | |
| Label | Used to enter name of decision outcome – e.g. Yes | |
| Volume | Define the volume. When the volume type is per unit time you can define the volume as Second, Minute, Hour, Day, Week, Month, Quarter, Year. When the volume type is percentage you can define the percentage value. Also, the volume specified in settings area is displayed here. If you reduces the ‘%’ value, the value defined within the settings area will also reduce proportionately (e.g. if the input volume is 1000 per year, and user selects 50%, then the label here will show 500 per year). | |
| Transit Time - Minimum | Define the minimum transit time. Select the correct unit from the dropdown provided. | |
| Transit Time - Typical | Define the general transit time. Select the correct unit from the dropdown provided. | |
| Transit Time - Maximum | Define the maximum transit time. Select the correct unit from the dropdown provided. | |
| Once all the fields are entered. click OK to save. |
||
|
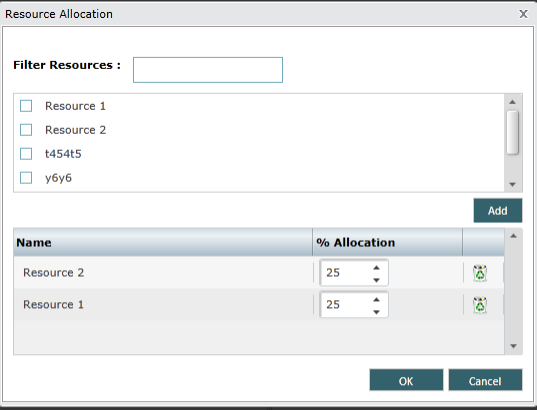
Resources |
Lists out the added resources. Click ‘Add Resources’ to open a pop-up where you can search, select multiple resources (via a checkbox), and select the percentage allocation for each (mandatory). The list here would display all resources defined within the Settings Area.
|
|
|
Time Spent |
Enter minimum, typical and maximum duration for the node. Select the correct unit from the dropdown provided. |
|
|
Time/Unit Volume |
Enter the time/unit volume. Select the correct unit from the dropdown provided. |
|
|
Fixed Cost |
Enter the fixed cost for the node |
|
|
FTEs |
FTE is auto-calculated. FTEs= ∑ [(Sum of Volumes from all incoming connectors to this shape *Time/Unit Volume*% Allocated)/(FTE Work Period)] - Time/Unit Volume is calculated to the hour using the work schedule of the resources. - FTE Work Period is what’s defined within the settings area, convert to same unit as the Time/Unit Volume (hours)by using the standard work schedule |
|
|
Total Cost |
Total Cost for each row is auto-calculated and displayed. Total cost = ∑ (Resource Cost-based on Time Cost Rate)+ ∑ (Resource Cost-based on Unit Cost Rate)+ Fixed Cost Resource Cost (based on Time Cost Rate) = (Cost Rate per Hour) *(% Allocated)*(Time/Unit Volume in hours)*(Sum of Volume from all incoming connectors to the selected shape) Resource Cost (based on Unit Cost Rate) = (Unit Cost Rate)*(% Allocated)*(Sum of Volumes from all incoming connectors to the selected shape) Fixed Cost = (Fixed Cost per Hour)*(Time/Unit Volume in hours)*(Sum of Volume from all incoming connectors to the selected shape) |
|
STEP 2: Click the 'save' icon to save the changes made.
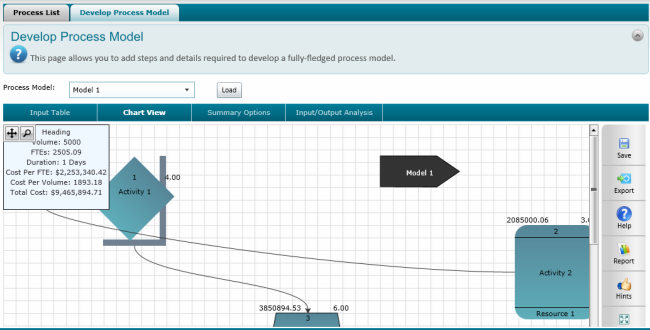
Chart View
The chart view will graphically display the process model created using the data in the input table to a process model.
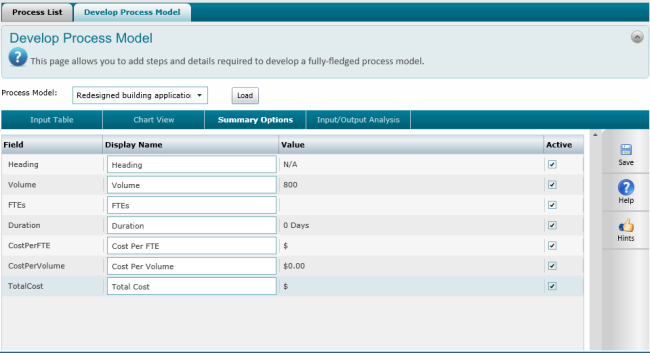
Summary Options
Summary options area allows you to edit the display names of summary fields and select which fields that should be displayed within the summary.
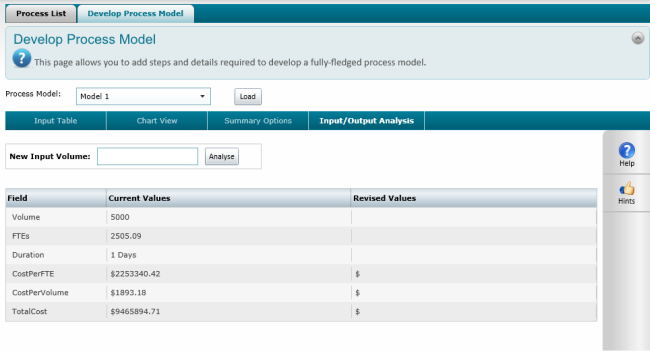
Input/Output Analysis
This area allows you to enter different values for Volume and see how it impacts the other values based on the process model created.
Enter a value in the New Input Volume text box and click Analysis.
Revised values column would display the recalculated values. However, this would not replace any of the original values entered.
New Cost per FTE = (Total Cost/new FTE)
New Cost per Volume = (Total Cost/new Volume entered by user)
Copyright © 2014-2015 CAMMS Online Help. All rights reserved.
Last revised: September 23, 2018