This object lets you create tasks for a given project and displays them in a graphical timescale format in a Gantt chart.
Hover over any of the coloured bars to see a quick summary.
Changes done to the Gantt chart table are displayed in the chart in real-time and vice versa. Also, the changes to the tasks are updated within the project record.
Gantt Chart Icons
The icons above the Gantt chart can be used to add and delete tasks as necessary, along with many other functions.
|
Icon |
Description |
|
|
Saves Gantt chart. |
|
|
Prints Gantt chart information. This provides different options to print. |
|
|
Refreshes Gantt chart. |
|
|
Adds a new task to the Gantt chart. |
|
|
Deletes the selected task from the Gantt chart. |
|
|
Indents / Outdents the selected task. |
|
|
Expands / Collapses the default Gantt chart view to fill the screen. |
|
|
Shows / Hides the critical path within the project schedule |
|
|
Expands / Collapses the task to show the associated sub tasks. |
Task Progress Indicators
The system uses the following icons to indicate the task progress.
|
Indicator |
Description |
|
|
'On track' This is displayed if the activities of a task are going according to the project schedule. |
|
|
'Monitor' This is displayed if the task needs to be monitored. |
|
|
'Off track' This is displayed if the activities of a task are going behind the project schedule. |
|
|
N\A This is displayed when a new task is created. After task details are entered, this is replaced by any of the above indicators. |
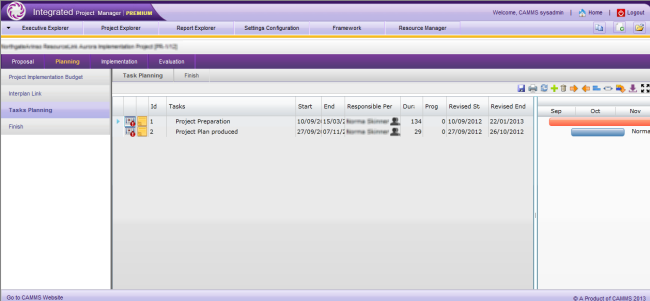
Create a New Tasks
STEP1: To add a new task, click 'Add' on the top of the Gantt chart. A new line will appear after the last task listed.
|
Field |
Description |
Mandatory/Optional |
|
ID |
The task ID. Non-editable for all Tasks. |
N/A |
|
Task |
Define a task title. Defaults to ‘new Task’. |
Mandatory |
|
Start Date and End Date |
Define task start and end date. By default, start date will be set to the project's start date and end date will be set to one week from the start date. This may change according to the values set by your system administrator. |
Mandatory
|
|
Responsible Person |
Select the task responsible person. The dropdown here will list only the members in the ‘Project Board and team’. By default, the responsible person will be copied from the previous task recorded. If this is the first task being recorded for the project, it will default to the Project Owner. |
Mandatory |
|
Duration |
Define the duration (in days) for the task. The task finish date will adjust according to the duration defined. Non- working days will be atomically excluded. Set to 7 days by default. |
Mandatory |
|
Status |
Select your task status from the dropdown.
|
Mandatory |
|
Predecessors |
Designate which task will be preceding the task that is being updated. Enter the task ID of the preceding task. |
Optional |
|
Completion Date |
Task completion date. |
Optional |
STEP 2: Click the ‘Save’ icon to save the modifications.
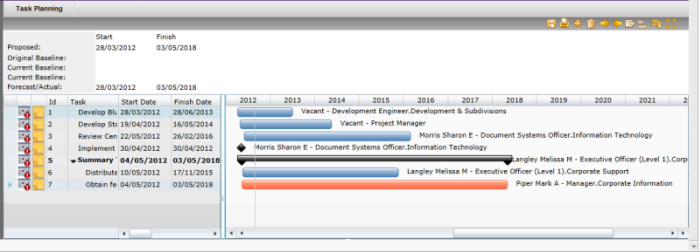
Outline tasks into sub tasks and summary tasks
Create an outline for your tasks by indenting and outdenting them to create the summary tasks (main task) and sub tasks. The summary tasks are bold and out-dented, and the subtasks are indented beneath them.
(add a screenshot of indent/outdent selection box)
Select the task that you need to modify and click on indent/outdent icons above the Gantt.
Or
Right click on a task and select indent/outdent.
Business rule -
If the main task has sub tasks then the main task start and end date will be dependent on its sub tasks. You will not be allowed to edit the main task start and end dates. This may change according to the settings configured by your system administrator.
By default, the progress percentage of the main task does not depend on the sub task progress. Hence, the main task progress percentage should be specified manually. However, your system administrator can configure the system to auto- calculate the task progress as an average of the subtask/s progress.
Create task dependencies
You can create logical links to depict dependencies between two or more tasks. The status of the "preceding" task directly affects the "successive" task.
STEP 1: Select the timeline of the predecessor task and connect it to the successive task by drawing a link using the mouse pointer. Connect this line to the other task that you need to link this task to.
The dependency will be set as finish-to-start by default.
STEP 2: The system provides the following options to define task dependencies. To customise the linking, right-click on the connecting line.
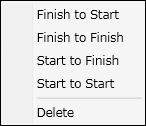
|
Link Type |
Description |
|
Finish to Start |
The preceding task must be completed in order for the successive task to start. (This is the default link.) |
|
Finish to Finish |
The preceding task must be completed in order finish the successive task. |
|
Start to Finish |
The preceding task must be started in order to finish the successive task. |
|
Start to Start |
The preceding task must be started in order to start the successive task. |
Remove the dependency between the tasks by selecting 'Delete' option.
Use the small up/down arrows on the left of the project, task or sub task titles to expand or collapse the associated hierarchy.
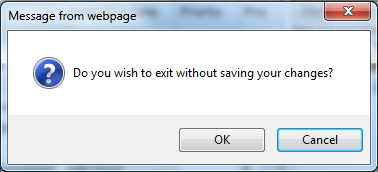
STEP 3: When you are happy with the modifications, click the 'Save' icon on the Gantt chart toolbar. The following screen dialogue is displayed when attempting to move to another page without saving the Gantt chart.
Printing Gantt Chart
STEP 1: Click 'Print Image' and select 'Print Table' to print the project table.
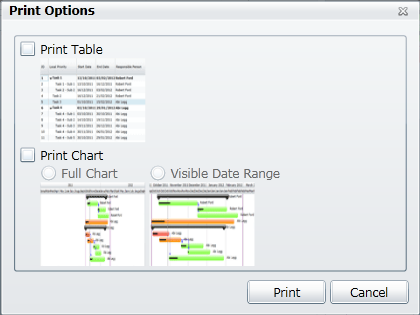
STEP 2: Select 'Print Chart' to print the Gantt chart in either 'Full' or 'Visible Data Range' modes. In the 'Visible Data Range' mode the currently visible data range is applied.
Copyright © 2014-2015 CAMMS Online Help. All rights reserved.
Last revised: September 23, 2018