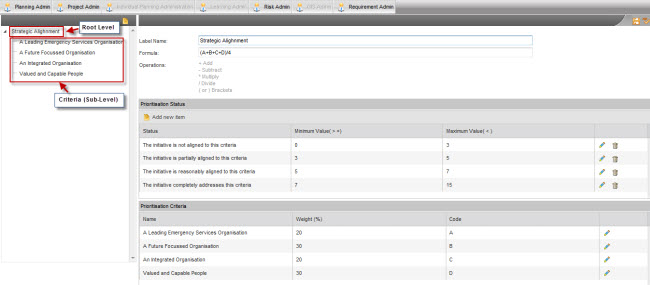
This section will allow you to configure the root level of the prioritisation and the sub levels known as criteria to derive the ranking for the requirement prioritisation.
Root level is the sole top level of the prioritisation tree that appears on the left side of the screen, and criteria would be the sub level added to the root level. However you have to note that you can add any number of criteria to the root level, but this will be a single node in the prioritisation tree as this tree will only have two levels defined.
Without adding criteria to the root level, it would be impossible to define the formula for the root level since the formula is described using the codes from the criteria. Later in this section, we have explained how the criteria is added and you would able to understand how the codes impact formula.
Configuring the Root level

You can define the name of the Root level in the text box given against the label name and you can describe the calculation in the formula text box. The operations which can be used for the calculations are listed right below the formula text box. Formula is always defined using the codes generated for the criteria since the prioritisation ranking is decided based on the criteria.
Prioritisation Status

This section of the page allows the user to define the prioritisation status using Minimum and Maximum values . "Add New Item" icon can be used to add a new prioritisation status to the root level and any existing prioritisation status can be edited or deleted using the respective icons given against the record.
Prioritisation Criteria

This section displays all the existing criteria under this root level. Optionally, you can define a weightage to the criteria using the edit icon. If you wish to provide a weightage to the list of criteria, please make sure that the total of weights come upto 100%.
Adding Criteria
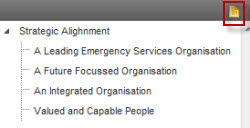
STEP 1: you can add a new criteria to the root level using the "Add New" icon shown above. Please note that when you are adding a criteria for the first time, you would not be able to see this icon until you click on the root level.
STEP 2: Once you click on the "Add New" icon, you will be taken to a screen as shown below.

you can define the name of the criteria and save the record.
STEP 3: When the criteria is saved, it will be added to the root level and an auto-generated code will be assigned to the criteria.

you can add the criteria options using the "Add New items" button which is shown above.
STEP 4: Once you click on the "Add New item", you would be able to define the name of the option and the value. when the details are entered, you can add the record to the criteria by clicking on the Tick sign.
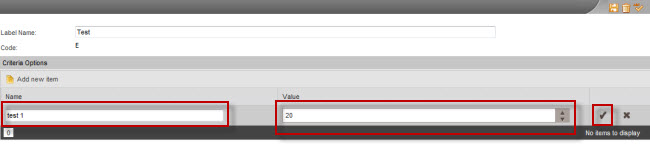
using the same method, you can add any number of options under the relevant criteria.
STEP 5: After you have made the necessary changes, click on the save icon.
After the adding the criteria, you can assign a weightage in the prioritisation criteria section as explained above.
Copyright © 2014-2015 CAMMS Online Help. All rights reserved.
Last revised: September 23, 2018